The Polyglot library is the ultimate solution for managing localizations in ZeppOS mini apps. Offering dynamic translation loading, language switching on the fly, and a user-friendly UI for language selection, Polyglot makes it super easy to cater to a global audience. With support for an extensive range of languages and an intuitive API, Polyglot helps developers effortlessly integrate multi-language support into their apps, enhancing the user experience for non-English speaking users.
Table of Contents
🔥 Strong Sides of Polyglot
- 🌍 Autotranslation of your mini app to 10+ languages within seconds
- 🔀 Real-time Language switching
- 🔄 Smart Language Mapping
- 📄 Easy translation management with a single Excel file
- 🛠️ Autogeneration of Language Files
- 📣 Event-Driven Localization
- ⚡ Quick integration with your mini app
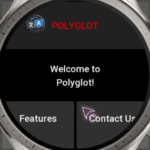
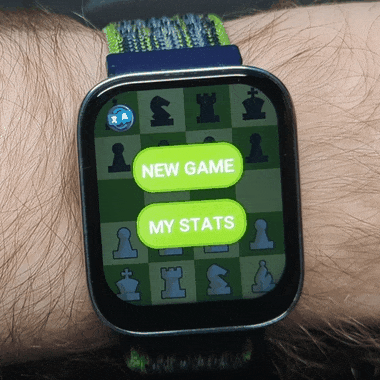
♞ Real-life example: Mini Chess
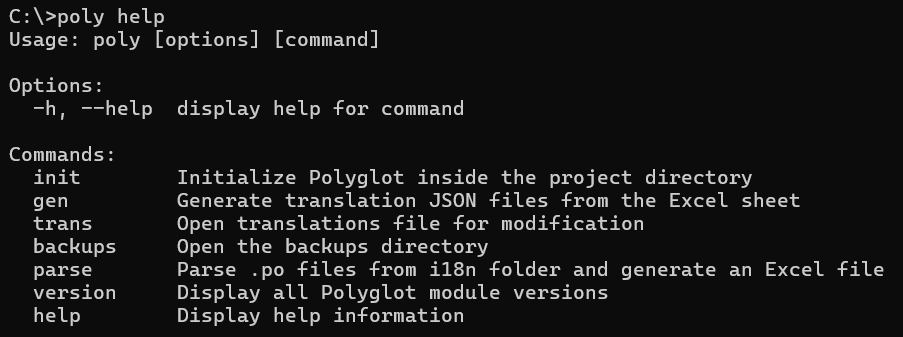
🔧 Installation
To integrate Polyglot library into your project, first, install Polyglot library system-wide:
npm i @silver-zepp/polyglot -g
💡Note the -g global flag
Then install the library inside any of your mini apps by running poly init from the root of your project.
poly init
🚩 Requirements
An Amazfit watch running ZeppOS v2 or higher.
For the convenience of managing all your translations in one place, Polyglot utilizes an Excel format .xlsx file. If you don’t have Microsoft Office installed, you can use one of these free alternatives to work with .xlsx files:
🎥 Video tutorial
🚀 Quick Start
- Install the library
npm i @silver-zepp/polyglot -g - Navigate into your mini app root folder and run
poly init - Run
poly trans - Setup the translations
- Run
poly gen - Implement
Polyglotin your mini app - Done!
📚 How Polyglot Works
Using Polyglot involves two main steps: setting up and generating translations with the poly utility, and then importing and using the Polyglot class in your mini app for localization.
Setting Up Translations with poly CLI tool
The poly tool is equipped with a set of command-line programs designed to manage your translations effortlessly. Here’s how to use it:
poly init
Initializes your project for use with Polyglot by setting up necessary files and dependencies. This is a mandatory first step before using any other Polyglot commands.
This command sets up the polyglot directory in your project, copies the global translations.xlsx to your project for local modifications, updates your project’s dependencies, and ensures the Polyglot library is correctly installed.
poly trans
Opens the translations.xlsx file where you can add, edit your keys and translations, as well as configure the translator’s behavior.
Use this command for direct editing of your translations spreadsheet. It’s essential for managing your translation keys and their corresponding translations.
poly gen

Generates translation JSON files from the translations.xlsx for each device your app is built for. It auto-translates text to all specified languages in the spreadsheet.
poly backups
Opens the backups directory where your translation backups are stored.
Use this command to access your translation backups, providing a safety net in case of issues with the current translations.xlsx file.
poly parse
Parses .po files from the i18n folder and generates an Excel file, helping you to quickly switch from a the old static i18n translation method to a dynamic polyglot.
After executing this command you can quickly incorporate your old strings into the translations.xlsx.
poly version

Displays the current version of the Polyglot module installed in your system and the project.
This command will show you the system module version, the project module version, and the latest online module version available on npm. It’s a useful check to ensure that your Polyglot tool is up to date.
Each of the above commands is designed to simplify the management and generation of translations for your mini app, ensuring a smooth workflow for localizing content across different languages.
Using Polyglot Class in Your Mini App
After setting up your translations, you can use the Polyglot class in your mini app to switch languages and retrieve localized texts.
Import the Polyglot class and use it in your mini app. Here’s a simple “Hello World” example:
					import { Polyglot } from "@silver-zepp/polyglot";

// create a new instance of Polyglot
const poly = new Polyglot();

// retrieve a localized greeting message
const greeting = poly.getText("hello");

// show the language switcher icon
poly.showPolyBubble("top-right");

// display the greeting message
console.log(greeting);
// output: "Hello, World!" in English
// or: "Bonjour, le monde!" in French

// register a listener for language change events
poly.onLanguageChange((language, texts) => {
    // log the text that is assigned to "hello"
    // key every time language changes
    console.log(texts["hello"]);
});
In this example, getText is a method of Polyglot that retrieves the translation for a given key (in this case, “hello”).
Here’s a visual “Hello World” example:
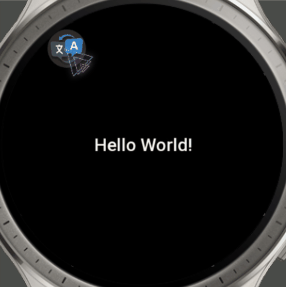
Here’s how it looks in code:
					const text_widget = createWidget(widget.TEXT, {
	...TEXT_STYLE,
	text: poly.getText("greeting")
});

poly.showPolyBubble();

poly.onLanguageChange((language, texts) => {
  text_widget.setProperty(prop.TEXT, texts["greeting"]);
});

Settings Tab
This tab allows you to configure various options for the translation generation. Each value is a drop-down list:
| Setting | Default | Description |
|---|---|---|
| autotranslate | TRUE | Set to FALSE to disable automatic translations using Google Translate. |
| mainlang | en-US | The primary language used as the base for translations. |
| generateicon | TRUE | Set to FALSE if you are using a custom icon or don't need the Polyglot icon. |
| iconres | 64 | The resolution for the Polyglot icon. Possible values are 32, 48, 64, 96 or 128 px. |
| charlimit | FALSE | Set a global character limit for all text. Individual limits can be set in the "LIMIT" cell. |
| trailingchar | … | The character to append when text is truncated by the character limit. Set to FALSE to disable. |
| apikey | null | Leave empty if you don't plan to translate walls of text. Otherwise provide Google Cloud API key. |
Keys Tab
Contains the translation keys used in your mini app. Populate it with your keys example, hello_world, SomeLongTEXT, etc.
Template Tab
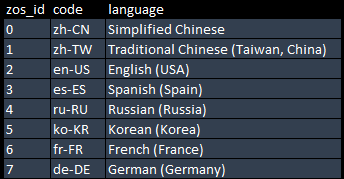
This tab is a pre-formatted template for new language sheets. Copy this template and rename it using the language code from the settings sheet (e.g., ja-JP).
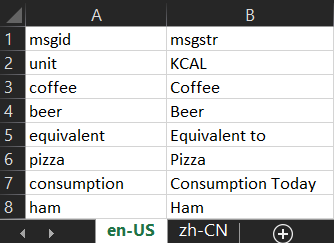
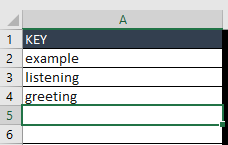
Language Tabs (e.g., en-US)
Each language tab should be named after the language code and contains the following columns:
| KEY | TEXT | LIMIT |
|---|---|---|
| example | Example text (REPLACE ME) | 0 |
| listening | Listening | 0 |
| greeting | Hello World! | 0 |
- KEY: Mirrored from the
keystab, these are the identifiers for your translations. - TEXT: For the main language sheet (as defined in
settings->mainlangvalue cell), this should be filled with the default text for each key. - LIMIT: An optional manual character limit for individual texts. If exceeded, the text will be truncated to this limit and the
trailingcharfrom the settings will be appended.
To use translations.xlsx:
- Fill in the settings tab with your preferred configurations.
- Add your translation keys to the “keys” tab.
- Provide the default text for each key in the main language tab.
- (Optionally) Use the template tab to create new language sheets or remove the ones you don’t need.
- Save and close the
translations.xlsxfile. - Run
poly gento generate the translation files.
🏛️ Polyglot Library Architecture
Assets Folder Structure
When poly gen is executed, it processes your source translations.xlsx file and creates new translation .json assets. Here’s an overview of the file structure that will be generated in the assets folder:
					assets/
    ├── raw/
    │   ├── polyglot/
    │   │   ├── translations/
    │   │   │   ├── en-US.json
    │   │   │   ├── es-ES.json
    │   │   │   ├── fr-FR.json
    │   │   │   └── ...
    │   │   └── poly-selector.png
    ...  ...
JSON Translations Contents
The JSON translation files contain key-value pairs where the key is a unique identifier for a string, and the value is the translated text for the particular locale. These files are used by the mini app to display text in the user’s preferred language.
en-US.json
Example translations for American English.
					{
  "example": "Example text",
  "greeting": "Hello World!",
  "app_title": "Awesome Mini App",
  "header": "Welcome to ZeppOS",
  "polyglot": "Polyglot"
}
fr-FR.json
Example translations for French.
					{
  "example": "Exemple de texte",
  "greeting": "Bonjour le monde!",
  "app_title": "Mini-application géniale",
  "header": "Bienvenue à ZeppOS",
  "polyglot": "Polyglotte"
}
Backups
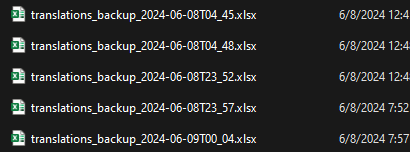
When you execute poly gen it creates a new backup .xlsx file. If you run it twice in the same minute, it will overwrite the file, otherwise it will create a new one. Poly selector image is available in 6 resolutions 32, 48, 64, 96 and 128 px. You can specify its resolution or disable its generation in the settings sheet after running poly trans. By default, it generates 64 px icon. Folder structure:
					polyglot/
    ├── backups/
    │   ├── translations_backup_2024-06-01T12_01.xlsx
    │   ├── translations_backup_2024-06-02T12_02.xlsx
    |   └── ...
    └── translations.xlsx
Language Detection and Fallback Strategies
Polyglot uses an intelligent language detection mechanism that automatically selects the appropriate language for the user based on system settings or saved preferences. If a translation is not available for the detected language, Polyglot employs a fallback strategy to provide a seamless user experience. Here’s how it works:
- Automatic Language Detection: Based on watch’s system settings, the most suitable language is chosen for the user.
- Adaptive Language Selection:
Polyglotautomatically aligns the app’s language with the user’s updated system settings, ensuring that user can change app’s language even if its developer haven’t implemented a manual switch inside their app. - Saved Preferences: User-selected language preferences are stored and retrieved upon the next application load.
- Fallback Mechanism: In the absence of a translation for the preferred language,
Polyglotwill fall back to a related language or a default language, that is defined in theapp.json. - Related Languages:
Polyglotcan map closely related languages and dialects to each other, ensuring that users receive the most understandable translation possible.
This approach ensures that the mini app remains usable and understandable, even if translations for a user’s primary language are not yet implemented.
💡 Important Notes
2. Currently Polyglot does not support App Side translations
3. If running poly version returns two different `system/local` versions, running any poly command ie poly gen will automatically update your local polyglot library per project
4. When running poly gen and a cell inside translation.xlsx has any value, the script won't touch it. This is made to make sure that the auto translator won't overwrite your manual changes in the excel file. If you would like to trigger the cell's translation, make sure it's empty.
5. If the autotranslation doesn't work, you might have to use a VPN to make sure you can access Google services
📝 Polyglot API Reference
Retrieves the translation text for a given key in the current language.
Parameters
{string} key– The key for the translation entry.
Examples
// example: get translation for the "hello" key
const greeting_text = poly.getText("hello");
console.log(greeting_text); // "Hello there!"Sets the current language for the mini app and loads the corresponding translation file. Optionally restarts the mini app if necessary.
Parameters
{string} language– The language code to switch to.{boolean} [restart_app=false]– Determines whether the mini app should restart after changing the language.
Examples
// example: change the language to French
poly.setLanguage("fr-FR");

// advanced example: change the language to Japanese and restart the app
poly.setLanguage("ja-JP", true);Retrieves the current language code.
Examples
// example: get the current language
const cur_lang = poly.getLanguage();
console.log(cur_lang); // "en-US"
Returns
{string} – The current language code.
Registers a callback function to be invoked when the language changes. The callback receives the new language code and the updated texts object.
Parameters
{function(string, Object)} subscriber– The callback function to call on language changes.
Examples
// example: subscribe to language changes
poly.onLanguageChange((language, texts) => {
  console.log(`Language changed to ${language}.
                        Updated texts:`, texts);
});Displays a language switcher button on the UI that allows the user to open the language picker. Provides optional settings to customize the language switcher appearance and behavior.
Parameters
{Object} [options={}]– Optional settings to customize the language switcher appearance and behavior.{string} [options.location="top-left"]– The location for the switcher icon on the screen.{number} [options.padding_mult=2]– The multiplier for padding.{number} [options.icon_size=64]– The size of the icon.{number} [options.padding]– The padding around the icon. Defaults to 5% of the smallest screen dimension.{number|null} [options.x=null]– The manual x-coordinate for the icon.{number|null} [options.y=null]– The manual y-coordinate for the icon.
Examples
// example: show language switcher at top-left with default options
poly.showPolyBubble();

// advanced example: language switcher at the bottom-right with custom padding
poly.showPolyBubble({ location: "bot-right", padding_mult: 3 });Hides and removes the language switcher button from the UI.
Examples
// example: hide the language switcher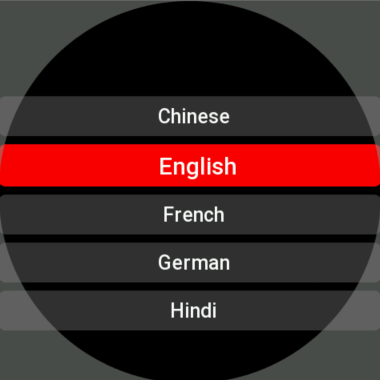
poly.hidePolyBubble();Displays a picker UI for the user to select a language from the available options. This method generates a user interface element that presents a list of language names. When a user selects a language from the list, the mini app’s language is set to the chosen one, and the picker UI is removed from the screen. The picker is populated with the names of languages for which translation files are available in the mini app.
Examples
// example: show the language picker
poly.showLangPicker();Gets the display name of the current language based on its code.
Examples
// example: get the display name of the current language
const lang_name = poly.getLangDisplayName();
console.log(lang_name); // "English"
Returns
{string|undefined} – The display name of the language, or undefined if not found.
Retrieves the system language name based on the system language code.
Examples
// example: get the system language name
const sys_lang_name = poly.getSysLangName();
console.log(sys_lang_name); // "English"
Returns
{string|undefined} – The name of the system language, or undefined if not found.
Retrieves the system language code.
Examples
// example: get the system language code
const sys_lang_code = poly.getSysLangCode();
console.log(sys_lang_code); // "en-US"
Returns
{string|undefined} – The system language code, or undefined if not found.
Retrieves the current resolution of the language switcher icon.
Examples
// example: get the current icon resolution
const icon_res = poly.getIconResolution();
console.log(icon_res); // 64
Returns
{number} – The current icon resolution.
Gets the related language code based on language relatability mapping. If no related language is found, the default mini app language is returned.
Parameters
{string} language– The language code for which to find the related language.
Examples
// example: get the related language code for Taiwanese
const rel_lang_code = poly.getRelatedLangCode("zh-TW");
console.log(rel_lang_code); // "zh-CN". Chinese will be returned as a closest match.Retrieves all translation texts for the current language.
Examples
// example: get all texts for the current language
const all_texts = poly.getAllTexts();
console.log(all_texts); // { greeting: "Hello there!", goodbye: "Goodbye!", ... }Gets a list of supported language codes based on the available translations.
Examples
// example: get all supported languages
const supported_languages = poly.getSupportedLanguages();
console.log(supported_languages); // ["en-US", "fr-FR", "ja-JP", ...]Checks if a given language code is supported by the mini app.
Parameters
{string} language_code– The language code to check.
Examples
// example: check if French is supported
const is_supported = poly.isLanguageSupported("fr-FR");
console.log(is_supported); // true or falseSets the paths to the language switcher icon for its normal and pressed states.
Parameters
{Object} paths– The paths to the icon image files.{string} paths.normal– The path to the normal icon image file.{string} paths.pressed– The path to the pressed icon image file.
Examples
// example: set custom icons for the language switcher
poly.setIconPath({
  normal: "assets://icons/custom-lang-icon.png",
  pressed: "assets://icons/custom-lang-icon-pressed.png"
});Retrieves a list of available translations for a specific key across all supported languages.
Parameters
{string} key– The key for which to find translations.
Returns
{Object[]} – An array of objects containing the language code and the corresponding translation text for the given key.
Examples
// example: get all translations for the "greeting" key
const available_translations = poly.getAvailableTranslationsForKey("greeting");
// [{ lang_code: "en-US", text: "Hello" }, { lang_code: "fr-FR", text: "Bonjour" }, ...]
console.log(available_translations);
Polyglot language picker view poly.showLangPicker():
Polyglot icons (normal | pressed) state: